
After shooting more than 10,000 homes over 14 years, I can tell you exactly what separates the pros who earn $1,000 a day from the amateurs who struggle to get their second client: a system.
When you walk into a house without a plan, you waste time. You hunt for “pretty” angles, you move furniture twice, and you inevitably miss a second bathroom or the furnace room, which results in a frustrated agent texting you at 9:00 PM.
In my business, RE Media Systems, everything is built on the 60-Minute Real Estate Photography Workflow. To hit that 60-minute mark and still deliver luxury-level quality, you need a mental (and physical) checklist. This isn’t just about taking pictures; it’s about covering the property in a way that tells a story and satisfies the buyer’s logical questions.
Quick Verdict: Why a Shot List is Non-Negotiable
If you aren’t using a standardized real estate photography shot list, you are leaving money on the table. A shot list ensures you never miss a room, keeps your editing consistent, and, most importantly, allows you to shoot faster.
The Goal: Every home, whether it’s a $200k condo or a $5M estate, should follow the same foundational logic. This guide gives you the exact room-by-room breakdown I use to maintain quality and speed.
Why Your Shot List Matters (The ROI of Consistency)
Consistency is the bedrock of a scalable business. If your photos look different every time, agents can’t trust you. If you take 50 photos for one house and 25 for another of the same size, your editing time becomes unpredictable.
A solid shot list provides:
- Predictable On-Site Time: You know exactly when you’ll be done.
- Standardized Editing: Batch processing in AutoHDR or Lightroom becomes much easier when you have a consistent number of angles per room.
- Reduced Liability: You have proof of every room’s condition, saving you from “did you break this?” disputes.
- Client Confidence: Realtors love knowing that no matter which of your photographers shows up, the result will be the same.
My Shot List: The Room-by-Room Breakdown

1. Exterior: The First Impression
The exterior shots are your “Hero” images. This is where the listing wins or loses the “click.”
- Front Straight-On: Capture the home directly from the center. Ensure your vertical lines are perfectly straight. Use a lens like the Sony FE 16-35mm f/2.8 GM II for most exteriors.
- The 45-Degree Angles: Move to the left and right corners of the property. These show depth and the relationship between the house and the garage/driveway.
- The Entry Path: A lower, inviting shot of the walkway leading to the front door.
- Neighborhood Context: One wide shot showing the house in relation to the neighbors (if the street is attractive).
2. Entry & Foyer: Setting the Tone
- The “Welcome Home” Shot: Standing just inside the front door, looking into the main living space. This establishes the “flow.”
- The Reverse Entry: Looking back toward the front door (especially if it has high-end glass or a grand staircase).
3. Living Room: The 3-Angle Rule
The living room is a “high-traffic” room. I follow the 3-angle rule here:
- Wide Anchor: From the main entrance of the room.
- The Opposite Corner: Shooting back toward the entry point.
- The Feature Shot: Focus on the fireplace, a large window view, or built-in shelving.
Pro Tip: Keep your camera at chest height (around 4-5 feet) for living rooms. Too high and the furniture looks flat; too low and you see the underside of the coffee table.
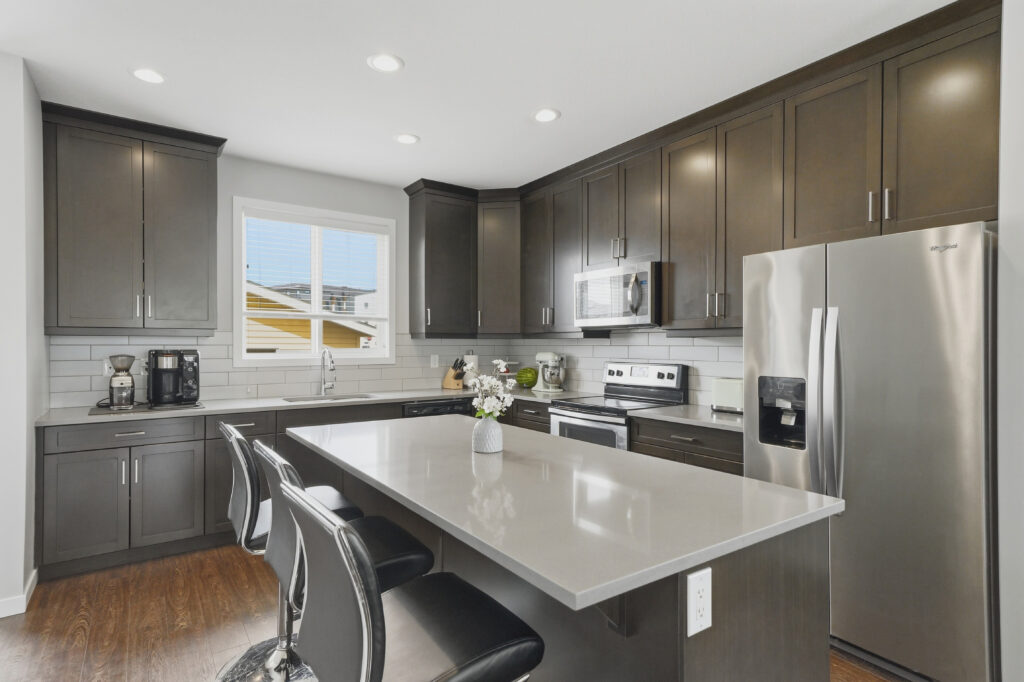
4. Kitchen: The Heart of the Home
If you mess up the kitchen, you might as well throw the whole shoot away.
- The Wide Anchor: Usually from the dining area looking in.
- The Island Shot: Field Note: “I always shoot the kitchen from the island looking toward the sink. It’s the most ‘lived-in’ angle and it sells the home better than any other shot.”
- Sightlines: An angle showing the connection to the living room or backyard.
- Pantry: If it’s a walk-in, one clean shot is mandatory.

5. Dining Room: Flow and Elegance
- The Table Anchor: Center the dining table in your frame.
- Chandelier/Feature: If there’s a designer light fixture, make sure it’s prominent.
- Connection Shot: Show how close the dining room is to the kitchen.
6. Primary Bedroom: The Sanctuary
- The “Big View”: From the doorway, looking at the bed. The bed should be the hero.
- The Corner Reverse: Looking back toward the ensuite or the closet.
- The Closet: For walk-in closets, use your widest lens (like the Sony 12-24mm) to show the organization system.
7. Secondary Bedrooms: Keep it Simple
Most secondary bedrooms only need one shot.
- The Doorway Wide: Back yourself into the corner by the door and get as much of the room as possible. Ensure the bed is made and the blinds are open.
8. Bathrooms: The Technical Challenge
Bathrooms are hard because of mirrors and tight spaces.
- The Vanity Shot: Avoid being in the mirror! Angle your tripod or use a geared head like the Manfrotto 410 Junior to fine-tune the perspective.
- The Tub/Shower: Show the tile work and the “spa” feel.
- The Toilet Rule: Always put the lid down. No exceptions.
9. Basement: Lighting Matters
Basements often lack natural light, making HDR techniques vital.
- Open Space Wide: Show the versatility (gym, theater, play area).
- Utility/Mechanical: Field Note: “Don’t skip the utility room. Buyers want to know where the furnace and water heater are. One clean shot here saves your realtor a dozen text messages.”
10. Backyard: The Lifestyle Shot
- The Wide Rear Elevation: Standing at the back of the lot, looking at the house.
- The Patio/Deck: Focus on the entertaining space.
- Landscaping/Fencing: Show the privacy and any mature trees.
Drone Checklist: The Aerial Advantage
Aerials are no longer “extra”, they are expected. I use the DJI Air 3S for its speed and reliability.
- The Front Oblique: 45-degree angle from about 30-50 feet up.
- Top-Down (The Map Shot): Looking straight down to show property lines and lot size.
- Neighborhood Context: High altitude (below 400ft) to show nearby parks, schools, or water.
- The Backyard Reveal: Looking from the back toward the house and the surrounding community.
For more on this, check out our Complete Guide to Drone Photography.

Twilight Checklist: The Golden Hour Sequence
Twilight photography can double your package price. It’s about the “glow.”
- Main Front Elevation: The classic hero shot with all interior lights on.
- Backyard with Pool/Firepit: If the home has outdoor lighting, this is where the magic happens.
- Entry Glow: A close-up of the front door with warm light spilling out.
Check out our video on The Secret to Twilight Photography to see how to fake this with AI if you’re short on time.
Luxury Additions: When the Price Tag is $1M+
Luxury homes require “lifestyle” shots.
- Wine Cellar: Detail shots of the labels and the cooling unit.
- Home Theater: Low-light shots (long exposure) with the screen on.
- Home Office: Focus on the desk and the view, sell the “work from home” dream.
- The Gym: Clean, wide shots showing the equipment density.
How to Adapt This List for Different Property Types
- Condos: Focus on the balcony view and the amenities (gym/pool). See my video: The Secret to Photographing Small Condos Fast!
- Vacant Homes: Use more angles to show “space” since there’s no furniture to anchor the eye. This is also a perfect time to upsell Fotello for virtual staging.
- Commercial: Focus on traffic flow, parking, and building signage.
Recommended Gear for Your Shot List
To execute this list efficiently, you need tools that don’t fight you.
- Camera: Sony A7 IV or Canon RF 15-35mm.
- Tripod: Manfrotto 055 Aluminum.
- Geared Head: Benro GD3WH (essential for straight lines).
- Software: AutoHDR for lightning-fast editing.

FAQ: Frequently Asked Questions
1. How many photos should I deliver for a 2,000 sq ft home?
Typically 25–35 photos. Quality beats quantity every time.
2. Should I shoot everything in HDR?
Yes. Modern HDR, especially when processed with AutoHDR, is faster and more consistent than flash (flambient) in 95% of homes.
3. What is the best lens for a small bathroom?
The Sony 12-24mm is my “secret weapon” for tight spaces.
4. Do I need to photograph the garage?
Only if it’s exceptionally clean or has features like epoxy floors or built-in cabinets. Otherwise, it’s a waste of time.
5. How do I handle messy rooms?
Politely ask the agent to help move clutter. If it’s too much, take the photo anyway and suggest Virtual Staging AI for digital decluttering.
6. Should I use a tripod for every shot?
For interiors, yes. For exteriors and drones, obviously not. Tripods guarantee the straight vertical lines that define professional work.
7. How high should the camera be?
Usually between 48″ and 60″. Aim for “light switch height” for a natural perspective.
8. Do I need to turn the TV on?
No. It creates glare and is distracting. If the agent insists, put a high-quality property photo on the screen via USB.
9. What if the sun is behind the house?
Shoot the back first, or wait for the sun to move. If you can’t wait, use Lightroom for a sky replacement.
10. Is a shot list too restrictive?
Not at all. It’s a floor, not a ceiling. Use it to cover the basics fast, then use your extra time for creative “hero” shots.
Final Thoughts: Systemize to Scale
A shot list isn’t about being a robot; it’s about being a professional. By standardizing your process, you free up your brain to focus on the artistry and your schedule to focus on more clients.
If you want to see exactly how I move through a house in under 60 minutes using this list, watch my “How to Shoot Your First House Like a Pro” video here.
Ready to level up?
Download my Free 30-Minute Shoot Blueprint™ and stop letting your workflow eat your hourly rate.