
I’ve spent 14 years in this industry and photographed over 10,000 homes. If there’s one thing I’ve learned, it’s that “good enough” doesn’t sell houses anymore, and it certainly doesn’t help you scale a media business.
When virtual staging first hit the scene, it was a clunky, expensive process involving specialized 3D artists and 48-hour turnaround times. Today, we have AI. We have tools like Virtual Staging AI that can furnish a room in 30 seconds.
But here’s the problem: because it’s so easy, a lot of photographers are getting lazy. I’m seeing listings every day where the “AI staging” looks like a scene out of a 2004 video game. The furniture is floating, the scale is off, and the style looks like a clearance sale at a futuristic furniture warehouse.
Bad virtual staging doesn’t just look unprofessional; it kills buyer trust and destroys your reputation with agents. However, if you do it right, AI virtual staging is one of the highest-margin add-ons in your entire arsenal.
Let’s break down the seven biggest mistakes I see photographers making with AI virtual staging and, more importantly, how to fix them so you can start charging premium rates for these “five-minute” tasks.
Quick Verdict: Is AI Virtual Staging Ready for Prime Time?
Yes, but with a caveat. AI staging is incredible for speed and profitability, but it requires a human “quality controller.” If you just “click and ship” without checking for scale, lighting, and style, you’re doing your clients a disservice. Use specialized tools like Virtual Staging AI, not general-purpose generative fill, and always follow a QA checklist.
1. The “Museum” Trap: Over-Staging and Clutter
The most common mistake I see is trying to fill every square inch of a room. I call this the Museum Trap. Because the AI has access to an infinite library of decor, it wants to use all of it.
When you over-stage, you actually make the room feel smaller. You’re covering up the very thing the buyer needs to see: the floor space and the architectural flow.
The Fix:
Less is more. A great virtually staged photo should have “breathing room.” In a living room, you need a sofa, a rug, a coffee table, and maybe one accent chair. You don’t need three floor lamps, a stack of books on every surface, and a giant plant in every corner. Focus on “lifestyle” staging, show how the room functions, not how much furniture it can hold.
2. The “Miniature House” Problem: Scaling Issues
Have you ever looked at a listing and thought, “Is that a really big sofa or a really small room?”
General AI tools often struggle with spatial reasoning. They might drop a massive king-sized bed into a guest room that only fits a double, making the room look tiny. Or worse, they put a “dollhouse-sized” dining table in a massive open-concept area. If the scale is off, the buyer can’t mentally “move in,” and the photo becomes useless for marketing.
The Fix:
Use the “Door Handle Test.” Look at the furniture in relation to the doors, windows, and light switches in the photo. If the back of the sofa is higher than the window sill, or if the dining chairs look like they belong in a kindergarten classroom, regenerate the image. Specialized tools like Virtual Staging AI are getting much better at depth-mapping, but you still need to use your eyes.

3. Style Mismatch: Trendy Furniture in a Historic Home
I see this all the time in my market. A photographer takes a beautiful, character-filled 1920s Tudor home and stages it with ultra-modern, neon-lit gamer furniture or “San Francisco tech office” vibes.
Virtual staging should complement the architecture, not fight it. If the staging feels like a “sticker” slapped on top of a photo, it’s usually because the design style is a mismatch for the home’s demographic and era.
The Fix:
Before you click “generate,” ask your agent who the target buyer is. Is it a young family? An executive? A retiree? If it’s a luxury suburban home, go with “Transitional” or “Traditional” styles. If it’s a downtown condo, go “Modern” or “Industrial.” Matching the furniture to the house makes the AI work feel like a real photograph.
4. The Floating Sofa: Bad Lighting and Shadow Matching
Nothing screams “FAKE” louder than a sofa that doesn’t cast a shadow. In the real world, light has a direction, a temperature (warm or cool), and a softness. If your room is lit by warm afternoon sun coming from a window on the right, but your AI furniture has flat lighting or shadows falling to the left, the human brain will instantly flag it as a “fake.”
The Fix:
This is why I recommend specialized real estate AI tools over general ones. A dedicated tool analyzes the “plate” (your empty room photo) to determine where the light source is. If you’re seeing “floating” furniture, it’s usually because the contact shadows, where the furniture touches the floor, are missing or too light.
Internal Link: Check out my guide on 7 Mistakes with AI Real Estate Photography for more on how to keep your AI work looking realistic.
5. The Secretive Stager: Not Disclosing AI Staging
This isn’t a technical mistake; it’s an ethical and legal one. Many MLS boards now have strict rules about AI-generated content. If you deliver virtually staged photos and the agent uploads them without a disclaimer, and then a buyer shows up to a completely empty house, they feel “catfished.” That frustration leads to lost sales and potential fines for the agent.
The Fix:
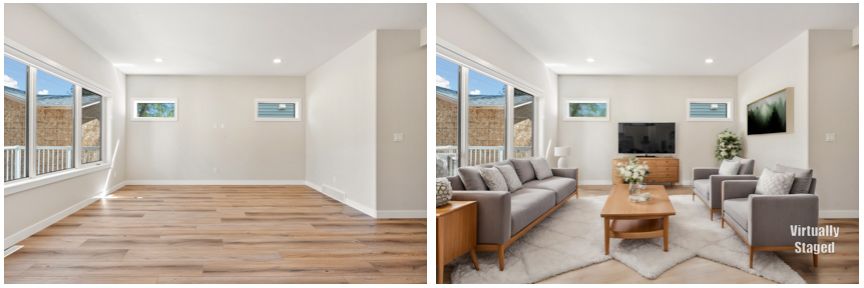
Always, always include a small “Virtually Staged” watermark or text overlay in the corner of the image. I also recommend delivering the “Before” (vacant) shot alongside the “After” (staged) shot. This helps the buyer see the potential while maintaining transparency. Trust is your most valuable asset in this business.
6. Using Low-Quality General AI Tools
If you’re just using the “Generative Fill” in Photoshop to add furniture, you’re working too hard and getting worse results. Photoshop is great for removing a stray power cord, but it wasn’t built to understand the specific geometry of a living room or the current trends in interior design. It often produces “mushy” textures or weirdly distorted furniture legs.
The Fix:
Invest in a tool built for the job. I’ve been testing Virtual Staging AI and the speed-to-quality ratio is hard to beat. It understands room types, handles the perspective automatically, and gives you high-resolution exports that don’t look like a blurry mess.

7. Ignoring Room Function and Traffic Flow
AI doesn’t know that people need to be able to walk to the bathroom. I’ve seen AI-staged rooms where a giant sectional is placed directly in front of a closet door, or a dining table is positioned so that you’d have to climb over it to get to the kitchen.
The Fix:
Think like an interior designer for 30 seconds. Look at the doors, hallways, and windows. Ensure there is a clear “path of travel” in the image. If the AI places furniture in a way that blocks a door, hit “regenerate.” This small detail makes the space feel “livable” rather than just “decorated.”
How Fixing These Mistakes Boosts Your Profitability
Virtual staging used to be a “maybe” service. Now, for vacant homes, it’s essential. Let’s look at the math from a business perspective.
Traditional Staging vs. AI Virtual Staging
- Traditional Physical Staging: Costs $2,000–$5,000+ per month. Requires movers, insurance, and physical inventory.
- Old-School Virtual Staging: Costs $30–$50 per photo. 24-48 hour turnaround.
- AI Virtual Staging (The Scott Prokop Method): Costs you about $1–$2 per photo (on a subscription) and takes 2 minutes of your time.
If you charge $35 per photo for virtual staging, which is the industry standard, and it only takes you 10 minutes to stage a whole house using a tool like Virtual Staging AI, your hourly rate for that task is effectively $600+ per hour.
By avoiding the 7 mistakes above, you ensure that the agent sees the value, the buyer loves the listing, and you keep that high-profit margin without the headache of outsourcing to an editor.
Internal Link: To see how AI is shifting the entire industry, read Why AI Editing Changes Pricing.
Scott’s Pricing Tips for Virtual Staging
I get asked all the time: “Scott, how do I sell this to my agents?”
- The “Hero Room” Upsell: Don’t just list it on your price sheet. If you shoot a vacant house, pick the best living room shot, stage it for free (with a watermark), and send it to the agent with the gallery. Say: “Hey, I noticed this room looked a bit empty, so I ran a quick AI stage for you. If you want the high-res, non-watermarked version plus the rest of the house staged, it’s only $X.”
- Package It: Include 3-5 virtually staged photos in your “Premium” or “Luxury” packages. This increases the perceived value of your top-tier offering without adding much to your actual workload.
- The “Declutter” Premium: Use AI furniture removal tools (available in many staging platforms) to help agents with “messy” listings. This is a huge problem solver for them, and you can charge a premium for it.
For a full breakdown of how to structure your fees, check out my Complete Real Estate Photography Pricing Guide.
Best Practices for Realistic AI Staging
If you want your work to stand out, follow this simple checklist for every image:
- Start with a High-Quality Base: You can’t stage a bad photo. Use a wide-angle lens (16-35mm), keep your camera level (straight verticals), and use a clean HDR workflow to ensure the windows aren’t blown out and the shadows aren’t “muddy.”
- Match the Resolution: Make sure your AI exports match the resolution of your original photos. Nothing looks worse than a sharp room with blurry “low-res” furniture.
- Use Multi-Angle Consistency: If you have two shots of the same living room from different corners, try to keep the furniture consistent. Some AI tools struggle with this, so you may need to pick the best angle for staging and leave the secondary angle vacant.
- The “Human Touch” Final Pass: Spend 30 seconds in Lightroom after staging to do a final color match. Sometimes a tiny bump in “Warmth” or “Vibrancy” is all it takes to lock the AI furniture into the room’s atmosphere.

Final Recommendation: Use the Right Tools
I’ve been at this for over a decade, and I’ve seen every “game-changing” tool come and go. AI is the real deal, but only if you use it to enhance your expertise, not replace it.
If you’re looking to add virtual staging to your business this week, I highly recommend checking out Virtual Staging AI. It’s the fastest way I’ve found to get high-quality, realistic results that I’m actually comfortable sending to my clients. It eliminates the “floating furniture” and “bad scale” issues that plague generic AI models.
The RE Media Systems Mission: We’re here to help you shoot faster, earn more, and build a better business. Virtual staging is one of the fastest paths to that “earn more” goal. Stop making these seven mistakes, start valuing your time, and watch your per-shoot revenue climb.
Ready to level up?
- Check out my Recommended Gear list for the best cameras and lenses for RE photography.
- Subscribe to our newsletter for more weekly tips on scaling your media business.
- Try Virtual Staging AI and see the difference for yourself.